• home
  • about
  • yoga
  • blog
  • contact
Menu

Dana Pauly Ryder

  • home
  • about
  • yoga
  • blog
  • contact
×
Avo Egg Salad

Avocado Egg Salad

Dana Ryder October 4, 2017

I first discovered avocado egg salad in the Hamptons of all places. Sounds goofy right? Well it was a combo I never had thought of before I popped into a little local juice bar in Amagansett to grab a juice and a snack, and picked up a container of their avo-egg salad to try. Well, let me tell you, I INHALED that entire container on the train ride back to NYC, it was that good! Makes sense I would like it though... It's a combination of my favorite foods: eggs and avocado. I actually can't believe I never thought of this on my own.

Avo egg salad

Luckily, the little container had all the ingredients listed (as it was homemade) so it was quite easy to recreate on my own, which I did - immediately of course. Now it's a staple in my kitchen, as it's the perfect snack full of healthy fats and protein that you can grab and go anytime. As most of my recipes are, this is only a few ingredients, most of which a lot of you will have in your kitchen already, except maybe for the paleo mayo. Read on for this delicious recipe - and be sure to let me know how yours turns out!

Avo egg salad

So unfortunately, this recipe is a guesstimate, because as usual, I threw things into a bowl and added or adjusted until it tasted just right. I need to stop doing that for the blog's sake, so I can actually give you guys exact recipes to try! Below should be pretty darn close though.

Ingredients:

  • 6-8 eggs, hard boiled
  • 1 full avocado, ripe/decently soft and pit removed
  • 1 bunch/2 handfuls of spinach, chopped
  • 2 tbsp paleo mayonnaise (you could use regular, but I highly recommend going paleo for this option - much healthier for you)
  • Juice from 1 lemon
  • 1 tbsp dijon mustard
  • Drizzle of olive oil (as needed)
  • Salt to taste

Directions:

  1. As mentioned above, make sure you hard boil the eggs prior to making this recipe of course. In a mixing bowl, chop or mash the eggs (with a potato masher), until the pieces are very small. 
  2. In a separate bowl, mash up the avocado and add the dijon mustard, lemon juice, and mayo olive oil, and mix well. 
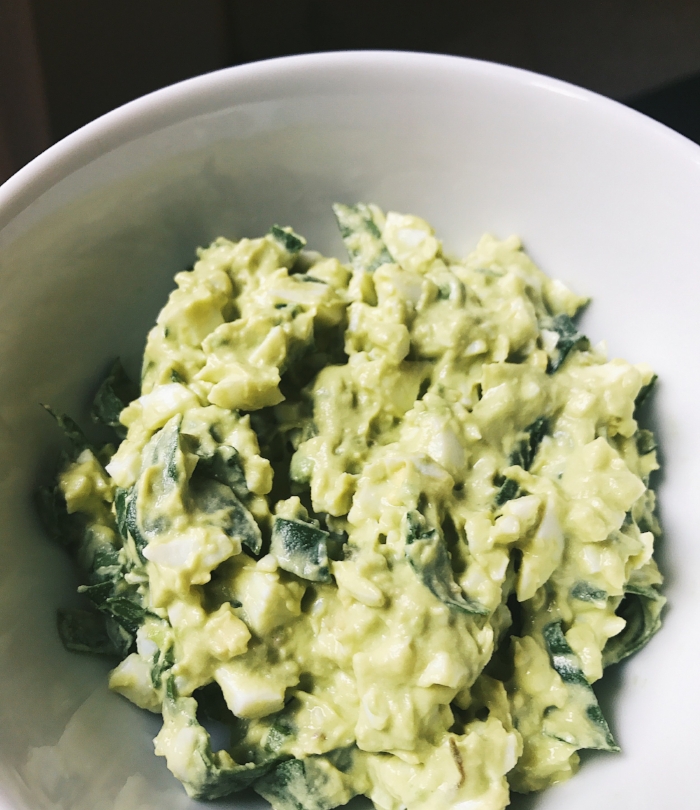
  3. Add the chopped eggs and spinach to the avocado mixture and mix. Season with salt to taste.
  4. Spread on bread, use as a side dish, or just eat it alone like I do!
signature.png
In Food & Drink Tags eggs, avocado egg salad, egg salad, gluten free, dairy free, avocado, health, healthy, wellness, health coach, holistic health, greens, clean eats, eat clean, health & wellness, recipe, easy recipe, healthy recipe, paleo, sugar free
1 Comment
Gluten Free Cheesecake | Casual Classic

Blackberry Cheesecake with Gluten-free Crust

Dana Ryder July 24, 2017

I've been on a sweets kick lately. I feel like all the blog posts I have lined up are for cookies, cakes, sweet treats, etc. I mean, that's not the worst thing in the world though, is it? I guess I'll try to sneak something a little different in there to mix it up though maybe.

Today's recipe is a new one for me. I'm the kind of person that likes to stick to things that involve chocolate, but for some reason, cheesecake was calling my name (that and I had fresh blackberries in my fridge that had to be used up). It's a pretty simple and quick recipe too, and deliciously rich so it'll make enough to last you weeks. I froze half of mine to save for later which worked out nicely.

Gluten Free Cheesecake | Casual Classic

You can use any fruit you'd like but this recipe does work best with berries - raspberries or blueberries would be a great substitute, and the lemon in this cheesecake gives it the perfect tart kick that cuts the sweetness a bit. I did sneak in a few superfoods, like chia seeds, gelatin, coconut oil, and of course the lemon juice I just mentioned, so you can't feel too guilty snacking on this delicious treat. Recipe below!

Gluten Free Cheesecake | The Casual Classic

Ingredients:

Crust

  • 2 cups of old fashioned oats
  • 3 tablespoons room temperature coconut oil
  • 2 tablespoons almond or cashew milk
  • 1 cup pitted medjool dates
  • 1/4 cup chia seeds

Filling

  • 2 8 oz containers of organic cream cheese
  • 6 oz fresh blackberries (or other type of berries)
  • 1/4 cup raw honey
  • 3/4 cup fresh lemon juice (about 3-4 lemons, juiced)
  • 1 tbsp gelatin powder

Directions:

  1. Line a 8x8 baking pan with parchment paper and set aside.
  2. Place the oats in the food process and process until finely chopped up. Add remaining crust ingredients and process until well mixed.
  3. Press the crust down into the pan firmly until well packed. It's easiest to use your fingers to make sure it's even across the entire pan.
  4. Once the crust is removed from the food processor, add the blackberries and process until pureed.
  5. Place the gelatin and lemon juice in a sauce pan and heat over medium heat for about 3-4 minutes until well dissolved and the mixture is warm (do not let it boil!). 
  6. In a separate bowl, whip the cream cheese and honey together. I used a hand mixer, which is kind of required, since this mixture is so thick.
  7. Add the lemon juice/gelatin mixture to the cream cheese and mix well. Lastly, fold in the pureed blackberries to create a marble like effect.
  8. Pour the cream cheese mixture over the crust and place in the fridge to let it firm up. You can also place in the freezer for about an hour to make this happen quicker.

*adapted from EatGoodForLife

As always, you can find most of these ingredients on Thrive Market, which is where I usually order them, since you get such a huge discount. Would love to hear feedback about how this turned out in the comments below! xoxo

In Food & Drink Tags gluten free, gluten free recipe, gluten free cheesecake, gluten free dessert, dessert, health, healthy, blackberry cheesecake, recipe, easy recipe, simple recipe, yum, delicious, delish, yummy, cheesecake, cheesecake recipe, chia seeds, coconut oil, thrive market, health coach, health blogger, clean eating, eat clean, eat real food, real food, healthy food, healthy recipe, health and wellness, wellness, treat yourself
Comment
The Casual Classic | Sweet Potato Brownies

The Deliciously Ella Sweet Potato Brownies

Dana Ryder March 27, 2017

I finally hopped on the bandwagon and tried the famous Deliciously Ella sweet potato brownies that everyone seems to rave about. Honest opinion? I wasn't obsessed with the flavor and texture of them, but these are almost completely added sweetener free and pretty darn healthy. That is the appeal of them though, right? Eating dessert without actually getting the bad side effects of it? I just think they taste a little more like a Luna bar then a brownie, but I'd make them again. That icing though... I'm planning on making just that and eating spoonfuls of it. It was AMAZINGGG. 

The Casual CLassic | Sweet Potato Brownies

Sweet potatoes are the star of this recipe as they are the base of the brownie. Nothing like mixing some healthy starch and fiber into dessert right? This recipe also calls for almonds and coconut oil, so they're also a very good source of healthy fats. They're super simple to make and full of good for you ingredients... Read on for the recipe if you're willing to give them a try.

Ingredients:

  • Brownies:
    • 2 medium sweet potatoes
    • 12 medjool dates
    • 6 tbsp maple syrup
    • 1/2 cup ground almonds
    • 2 tbsp melted coconut oil
    • 1/2 cup ground oats
    • 6 tbsp cacao powder
    • a pinch of salt
  • Icing:
    • 2 tbsp coconut oil
    • 2 tbsp almond butter
    • 1 tbsp maple syrup
    • 2 tbsp cacao powder

Directions:

  1. Preheat the over to 350 degrees.
  2. Peel and cut the sweet potatoes into chunks and steam them until they are soft. I believe you could also boil them in water until soft too if you'd like.
  3. Place cooked sweet potato and pitted dates in a food processor together and blend until well mixed.
  4. Mix remaining brownie ingredients in a bowl together and stir.
  5. Next, pour the sweet potato/date combo into the bowl with the remaining brownie ingredients and mix well. 
  6. Grease or line a brownie pan with parchment paper, and pour the brownie mix into the pan.
  7. Bake at 350 degrees for about 45 minutes or until you can pierce the brownies with a toothpick and it comes out dry.
  8. Remove from the oven and let it sit for about 10-20 minutes - do not touch it! It is important for them to cool down before you cut them up.
  9. To make the icing, simply put all the ingredients into a bowl and melt them in the microwave (about 30 seconds to 1 minute). Stir well and place in the fridge for about 15-20 minutes to harden it up a bit so you can spread it! 
  10. Allow the brownies to cool before icing, otherwise it will melt fast! Or just eat the icing on it's own like I plan to do. :) 
In Food & Drink Tags Deliciously Ella, sweet potato, sweet potato brownies, paleo brownies, paleo, brownies, healthy, health, health coach, IIN, chocolate, cacao, yum, yummy, gluten free, vegan, gluten free brownies, dairy free, delicious, delish, easy recipe, healthy recipe, simple recipe, healthy life, clean eating, eat clean
Comment
Older →

Search Posts

Archive Block
This is example content. Double-click here and select a page to create an index of your own content. Learn more
Post Archive
  • Photography
 

Featured Posts

Summary Block
This is example content. Double-click here and select a page to feature its content. Learn more
Featured
Jun 15, 2025
Cursus Amet
Jun 15, 2025
Jun 15, 2025
Jun 8, 2025
Pellentesque Risus Ridiculus
Jun 8, 2025
Jun 8, 2025
Jun 1, 2025
Porta
Jun 1, 2025
Jun 1, 2025
May 25, 2025
Etiam Ultricies
May 25, 2025
May 25, 2025
May 18, 2025
Vulputate Commodo Ligula
May 18, 2025
May 18, 2025
May 11, 2025
Elit Condimentum
May 11, 2025
May 11, 2025
May 4, 2025
Aenean eu leo Quam
May 4, 2025
May 4, 2025
Apr 27, 2025
Cursus Amet
Apr 27, 2025
Apr 27, 2025
Apr 20, 2025
Pellentesque Risus Ridiculus
Apr 20, 2025
Apr 20, 2025
Apr 13, 2025
Porta
Apr 13, 2025
Apr 13, 2025

Powered by Squarespace